Brand:Allen-Bradley Model number:1734-IB8
Country of origin: United States Product weight:0.090kg
HS code:8471800000
Product Details:
1734-IB8 Allen-Bradley Power Module
Product Dimensions:
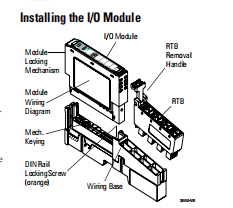
1. Position the interface above the DIN rail. 2. Press down firmly to install the interface on the DIN rail. 3. The locking mechanism will lock the interface to the DIN rail. 4. Remove safety end cap. Slide it up to expose backplane and power connections
If installing a replacement interface to an existing system: 1. Position the interface above the DIN rail. 2. Slide the interface down allowing the interlocking side pieces to engage the adjacent module. 3. Press firmly to seat the interface on the DIN rail. The interface locking mechanism will snap into place. 4. To remove the interface from the DIN rail, pull up on the RTB removal handle to remove the terminal block. 5. Use a small bladed screwdriver to rotate the DIN rail locking screw to a vertical position. 6. This releases the locking mechanism. Then lift straight up to remove.
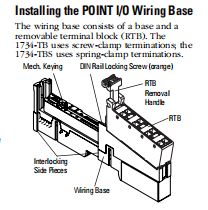
1. Position wiring base vertically above installed units (interface, power supply or existing module. 2. Slide the wiring base down allowing the interlocking side pieces to engage the adjacent module or interface. 3. Press firmly to seat the wiring base on the DIN rail. The wiring base will snap into place. 4. To remove the wiring base from the DIN rail, remove the module, and use a small bladed screwdriver to rotate the base locking screw to a vertical position. This releases the locking mechanism. Then lift straight up to remove. Installing the Removable Terminal Block A removable terminal block is supplied with your terminal base. To remove, pull up on the RTB removal handle.
The module can be installed before, or after base installation. Make sure that the wiring base is correctly keyed before installing the module into the wiring base. In addition, make sure the wiring base locking screw is positioned horizontal according to the base. 1. Using a bladed screwdriver, rotate the keyswitch on the wiring base clockwise to until the number required for the type of module being installed aligns with the notch in the base. 2. Make certain the DIN rail locking screw is in the horizontal position. (You cannot insert the module if the locking mechanism is unlocked.) 3. Insert the module straight down into the wiring base and press to secure. The module will lock into place.


We have the same series of models in stock. If you don't find the model you need, please contact us and we will provide you with an official quotation!
Allen-Bradley 440G-TZS21UPRH
Allen-Bradley 700-HLS1U2
Allen-Bradley 1440-SDM02-01RA
Allen-Bradley 1492-IFM40F-3
Allen-Bradley 1746-A10
Allen-Bradley 1746-NI4
Allen-Bradley 1746-NI8
Allen-Bradley 1747-L541
Allen-Bradley 1747-L552
Allen-Bradley 1756-A4
Allen-Bradley 1756-A10
Allen-Bradley 1756-A13
Allen-Bradley 1756-DHRI0C
Allen-Bradley 1756-DNB/A
Allen-Bradley 1756-EN2T
Allen-Bradley 1756-EN2TR
Allen-Bradley 1756-ENBT
Allen-Bradley 1756-IA16I
Allen-Bradley 1756-IB16
Allen-Bradley 1756-IF16
Allen-Bradley 1756-IR6I
Allen-Bradley 1756-L7SP
Allen-Bradley 1756-L71
Allen-Bradley 1756-L71S
Allen-Bradley 1756-L81ES
Colour:new Warranty: 12 months
Lead Time:3-day working day Price: Please contact us
Shipping Port: Xiamen, China Payment:T/T
Express cooperation: fedex, DHL, UPS and your express account
Service: Professional Sales provides 24 hours /7 days online service
Our service:

Fast delivery, and can be used with your express account.

Competitive Price

Free Shipping

One-year warranty